Are you struggling to make sure that your carefully written emails reach your recipients’ inboxes?
It is quite logical to worry if you haven’t implemented the necessary steps to make your emails fall straight into the recipient’s mailbox. You can do it by securing your emails using email authentication protocols like SPF and DKIM.
According to RedHunt Labs, SPF is the primary defense against spoofing. Yet over 68% of domains lack SPF records, making them vulnerable to spoofing attacks.
With this guide, you can explore two important authentication protocols, SPF and DKIM. These protocols make sure that your emails are not only delivered but also trusted by email providers.
Benefits of SPF authentication
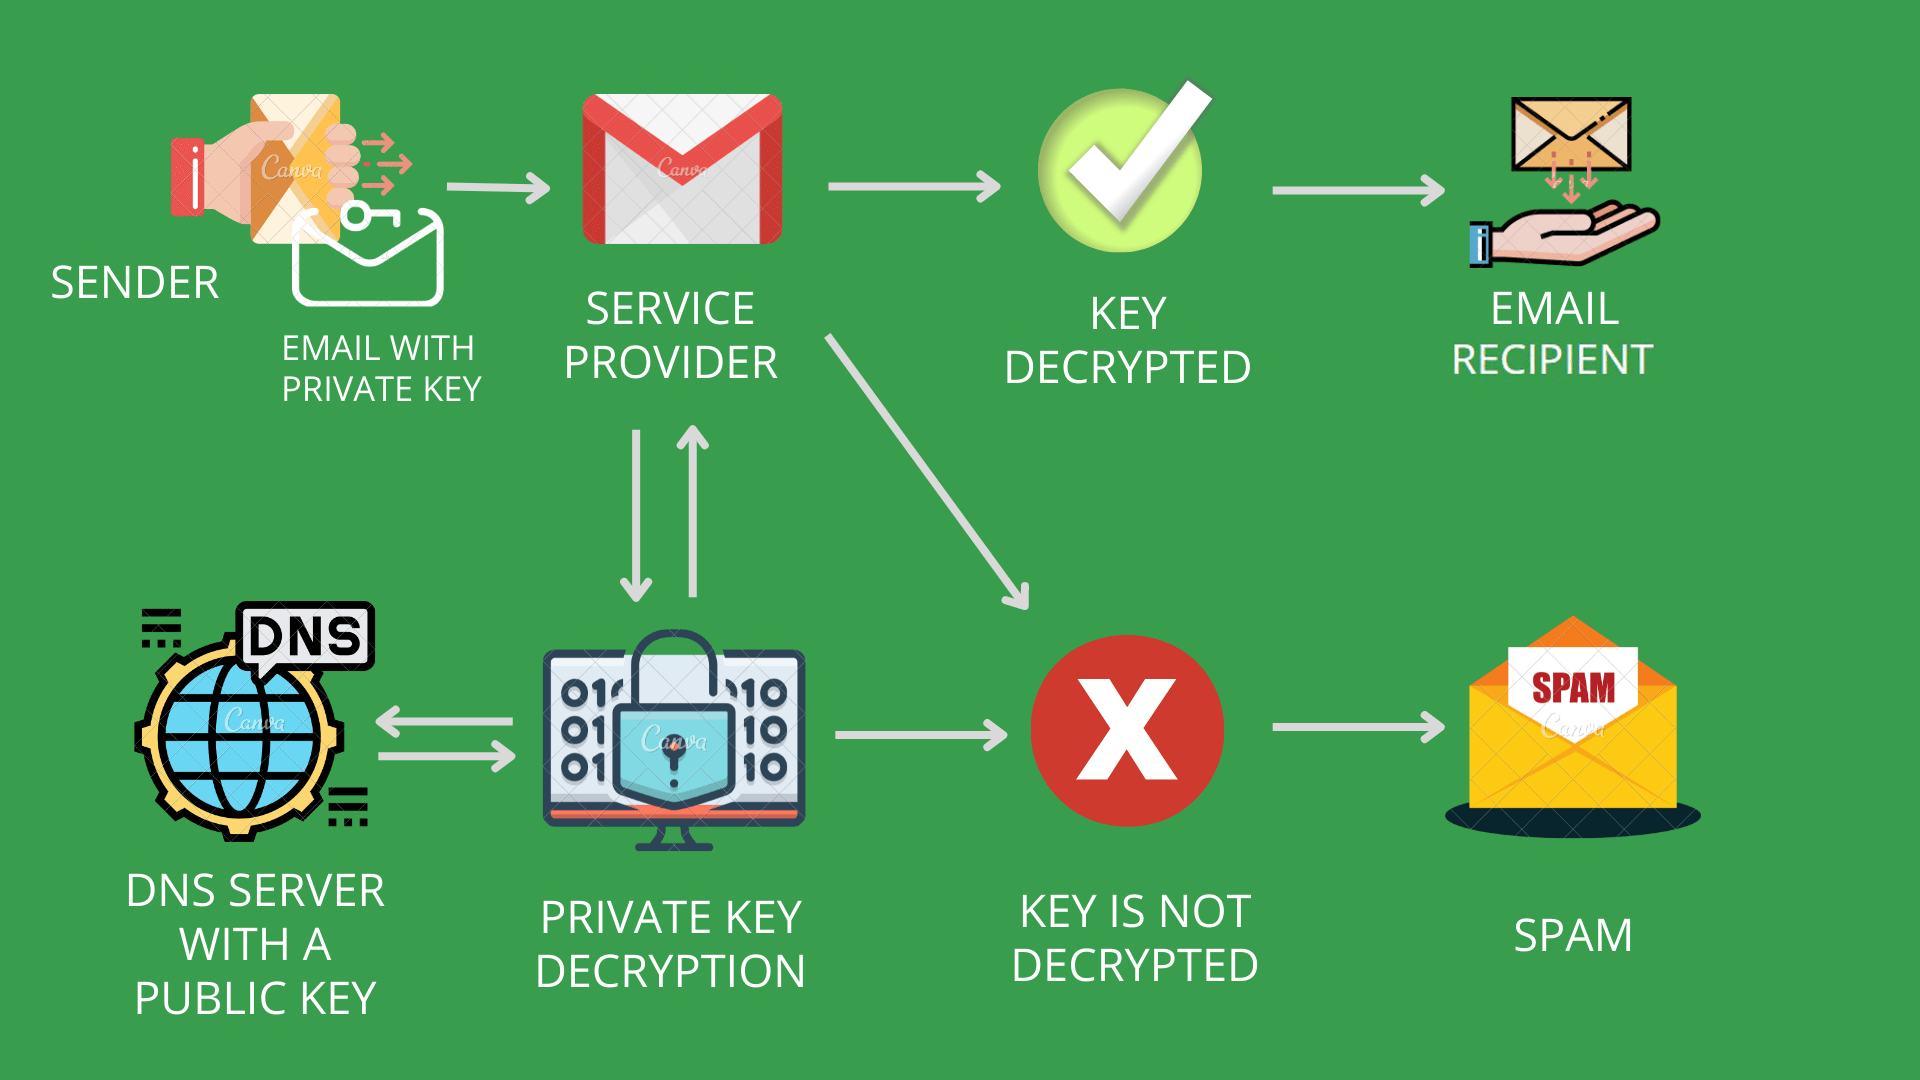
Sender Policy Framework (SPF) lets email senders authenticate their emails. With this email service providers can verify the authorization of the email sent from a specific source.
You can tell email servers about who’s allowed to send emails on your website. This just needs to set up an SPF record on your Gmail. Therefore, when someone tries to send you an email that is not on the list, it doesn’t let the email enter the mailbox.
Other than this, SPF also stops spammers from pretending to be you, which helps keep your reputation and ability to deliver emails intact. Plus, it lets recipients know if spammers try to use your name.
It makes it easier for your emails to get through security checks, meets some email rules, and improves your sender score. With all of these, it gets easier for your email to reach its destination.
Implementing SPF authentication
Here are a few simple steps to set up an SPF record on your Gmail.
- Access DNS Settings: First, go to your DNS settings provider’s website or platform. Here you can manage your domain’s DNS settings
- Create TXT Records: Create a TXT record name @ or anydomainame.com.
- Set a value: Assign the value “v=spf1 include:mxsspf.sendpulse.com +a +mx ~all” to the TXT record. If you already have an existing SPF entry, just add “mxsspf.sendpulse.com” to it.
- Paste Values: Paste the corresponding record values in the fields mentioned.
- Adding servers: Include the service values of the third-party servers.
- Save Records: Apply the changes by clicking on ‘Save Record”.
Once you have added the entry, give it around 24 hours for the activation. It varies according to the server speed.
Advantages of DKIM authentication
DomainKeys Identified Mail is an email authentication protocol that adds a digital signature to the outgoing email’s header. It is used to verify the authenticity of emails. This is created using a cryptographic key that only the sender knows. And a public key published in the sender’s DNS record.
Implementing DKIM provides several advantages for email authentication. It acts as a tamper-proof seal that adds integrity to the sent email. The receiver’s server uses a corresponding key to confirm that the email has not been altered.
By setting this up, you can also solve branding issues in email headers. Like emails being marked as sent “on behalf of” a different domain. This enhances the email’s credibility and reinforces the brand’s identity in the inboxes.
Configuring DKIM Authentication
You can configure DKIM authentication on Gmail by following these steps.
Get the DKIM key from the Admin Console
- Sign in to the Google Admin page solely as an administrator.
- Access Apps > Google Workspace >Gmail > Authenticate email.
- Select the domain. Click ‘Generate New Record”.
- Choose the DKIM key settings and click “Generate”.
- Copy the DKIM values provided.
Add the TXT record and DKIM key to the domain
- Log in to the domain provider’s management console.
- Locate the DNS settings page.
- Add a TXT record using the DKIM values from the Admin Console.
- Save the changes.
Turn on the DKIM signing
- Sign in to the Google Admin console.
- Go to Apps. Select Google Workspace, Open Gmail, and enter Authenticate email.
- Select the domain and click “Start authentication”.
Verify DKIM authentication
- Send an email to a recipient using Gmail or Google Workspace.
- Look for “Authentication-Results” in the message header to ensure DKIM is enabled.
- After enabling Gmail for your organization, wait 24–72 hours before setting up DKIM to avoid errors.
- If you have multiple domains, repeat the process for each domain.
- For subdomains, follow specific instructions for adding DKIM keys.
- Authentication through DKIM may take up to 48 hours to start working after setup.
- Turning off DKIM is not recommended as it exposes your domain to scammers.
- If it isn’t working, troubleshoot DKIM by reviewing the steps. Seek help from your domain provider.
- Verify that DKIM authentication is correctly configured to ensure email security and prevent impersonation.
Key differences between SPF and DKIM
Here are some key differences between SPF and DKIM unique.
| Feature | SPF | DKIM |
|---|---|---|
| Sender authentication | SPF allows senders to specify authorized IP addresses. | DKIM uses encryption keys and digital signatures for email verification. |
| Encryption Algorithm | SPF does not employ encryption algorithms. | DKIM utilizes encryption algorithms to generate electronic key pairs. |
| Message Envelope Handling | SPF adds information to the message envelope. It may be removed by forwarding servers and can affect verification. | DKIM’s digital signature remains intact even when messages are forwarded. It ensures verification integrity. |
Implementing DMARC for comprehensive protection
Adding DMARC setup with SPF and DKIM provides an extra layer of security for email authentication. DMARC instructs servers on how to handle emails that fail SPF or DKIM checks, while SPF and DKIM authenticate emails.
Additionally, DMARC records send reports to domain administrators detailing which email will pass or fail authentication checks. These reports empower administrators to make informed decisions about adjusting DMARC policies. PowerDMARC also provides comprehensive reports and analytics to monitor email traffic.
Conclusion
Nowadays, when email-based threats like phishing and spoofing are prevalent. It is essential to ensure the authenticity and security of your email communication system. You must use authentication protocols such as SPF and DKIM to enhance Email security.
These protocols add extra layers of protection to your emails. Using DMARC in addition to both these protocols can also reduce the risks of email spoofing. DMARC provides detailed reports to fine-tune authentication protocols.